As an Admin you will possibly spend quite a lot of your time customising your companies and client Salesforce Organisation. This could be anything from adding a new field or picklist value. However, if it is something a little more complicated such as a validation rule or creating a new object, Salesforce best practice basically states that you simply back away from your live org and continue to create and test in your configuration environment- The Sandbox.
It is only then that you should move on to deploying the customisation to live with Change Sets – the little beauties which will determine whether the customisations you have created in the testing environment will be compatible with your live org configuration. Nothing could be more simple, right? Not quite.
I often hear that some Admins do not use Change Sets for customisation leading them to having all sorts of issues in their live orgs. I hold my hands up, I too am guilty of not using them in the past. However, I soon learned how to use them, which also taught me just how invaluable they are to the smooth running of the live orgs that you administer.
For example, I recently came across an issue where Sale Users where no longer able to create new Opportunities without receiving an invalid data error message. After investigating further, the cause pointed to a validation that was created which incidentally prohibited the creation of new Opportunities. My point? If this was done in Sandbox first, then the users would not have been experiencing the issue and valuable time to find and fix the issue would have been spent elsewhere.
So if you have made amendments in your live org which had consequently stopped other users from accessing data then this post may be for you.
In just 4 easy stages you can configure without errors. Let see how.
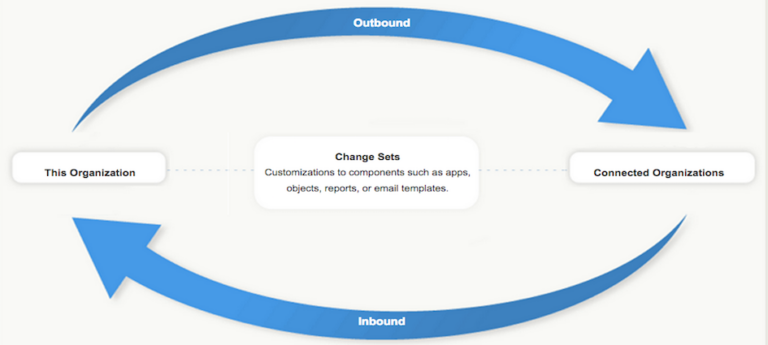
As we know from above, Change sets are created in your test org and are sent to your production organisation in an Outbound Change Set. Now there are a plethora of documentation out there that provides step by step instructions on how to create Change Sets, just click here for the Salesforce documentation. However, here is a simple example of a change set which could be carried out in no time at all.
So you have created a simple validation rule in the test org that stops fields from being changed if a particular value is selected. You next step would be the creation of the change set.
Simply navigate to – Setup>Deploy>Outbound Change Set>New, then –
1. Add the Name of the Change Set along with a Description which is optional
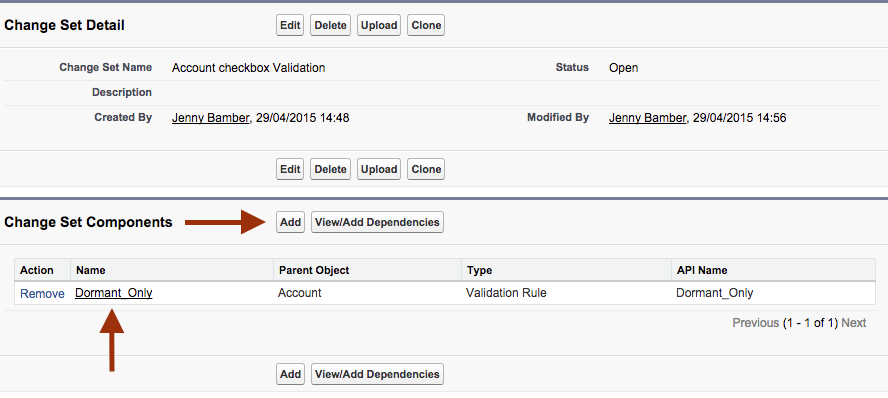
2. Add the Change Set Components
3. Select the Component Type (i.e. the customisation you have made)
4. Select the checkbox next to the required component
5. Click Add to Change Set
6. Repeat step 3-5 if necessary
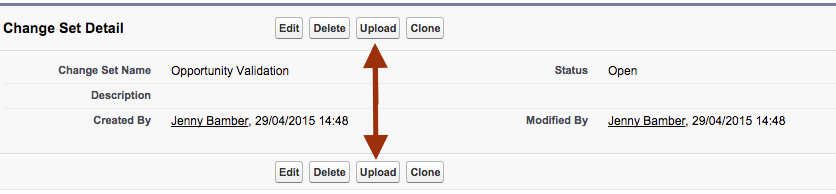
Once the components have been added you are two steps away from uploading the Outbound Change Set to the live org.
1. Simply click Upload
2. Select the target organisation and click Upload once again.
3. Navigate to the production org you have uploaded the Outbound Change Set to.
Now that was too easy!
There is no room for error when it comes to deploying your customisations, that is why you should always validate a change set.
In the live org, simply navigate to Setup>Deploy>Inbound Change Set> Click the name of the change set you have uploaded>Validate
Validating will simulate deploying the Change Set, which will generate a success or failure message upon completion You are able to check in on the deployment status and watch the progress of the validation in real-time.

The process will run through the components of the change set and will then continue to do run the Apex tests. Both need to be successful in order for the Change Set to be deployed.
If the validation has failed, you will be provided with information on why it failed. It is also worth noting that if it has failed, you will need to re-upload the Change Set with the added/missing components and then validate until the Change Set is successful.
FYI. Not all validations are quick. So while you are waiting for the validation to complete, why not join in on Twitter with #DeploymentFish. What deployment fish species will you end up with?
Easy to Deploy
If validation was successful, the only thing left to do is DEPLOY and let your users enjoy the new customisations.
For Change Set best practices click here. Enjoy making more Change Sets and less mistakes.
See you next week.
Jenny